Skip to main content
How to Make a Single Beam Reflection Hologram
by Jason Sapan
The simplest hologram is a Single Beam Reflection Hologram, sometimes called a Denisyuk Hologram or an On Axis Reflection Hologram. It can be seen in white light. It can be made with a small 5 milliwatt (mw) Helium-Neon (He-Ne pronounced “he knee“) or diode laser (producing a continuous red beam), a 10 to 20 power (10x – 20x) microscope objective (lens) and some holographic film. You can use a less powerful laser but you will need to make your exposure time longer. And of course if you have a more powerful laser you should shorten your exposures. Lasers that are polarized have more useful power for making holograms. Make sure that the laser is rated TEM 00, this means that when you spread the beam out with a lens there will be no dark spots. For instance TEM 01 would produce a beam with a black hole in its center and is referred to as the doughnut mode. TEM stands for Transverse Electromagnetic Mode, and the two numbers following are the graphic Cartesian coordinates of holes in the beam. Always exercise care in using a laser. Do not point it at anyone or look directly into it.
You will need to create a simple darkroom with a dark green safelight with a 20 watt or less bulb or a green LED at least 8 feet from the film. You need at least 3 developing trays, holographic developer (consult with the people you purchase the holographic film from), a good holographic bleach, and a tray with water and a half a cap full of Kodak Photo-Flo as a final anti spotting bath. You also need a sink. A bathroom is okay if nothing else is available. Just make sure it is light tight. You should test the safelight by placing a small piece of your holographic film out where you do your developing for about 10 to 15 minutes. Develop it and see if it is exposed by the safelight. If it turns dark in the developer then you need more green on your filter or less light. A dimmer switch on the light can help.
The 5 mw He-Ne laser will cost around $20 – $200 US on the web. You can also use a laser diode (like you find in a laser pointer but the cheap ones have stability issues, most notably “mode hopping” that can degrade your hologram results). Look for one with a removable columating lens, so the beam comes emerges already spread out, as opposed to the usual thin line beam. You can get one at Integraf.com. If you use this you can skip buying the microscope objective. A microscope objective is cheap. And film costs around $5 for a glass plate. Film costs a bit less. Film on a roll is cheapest but you have to buy a lot at once. Glass plates are considered best and are easiest to use. Developing and bleach formulas are available from the people who sell you the film like the BB plates from colourholographics ir Skavich PFG-01 or PFG-03 plates from Geola Labs or Integraf on the web. My favorite holographic plates are U08 from Ultimate.
This is the way I make single beam reflection holograms. Remember, there are many other ways to make this or any type of hologram. Feel free to experiment with the geometry.
If you can, make an isolation table for your hologram set up. However, it is not essential for a successful exposure, but it will help you obtain brighter holograms in a noisy environment. An isolation table can be as simple as floating a slab of granite, marble, or 1/4 inch thick steel on an inner tube. This acts as a shock absorber. Some people make a sandbox and float that on the inner tube. The table top should be rectangular at least 3 feet by 4 feet. Longer is better than wider. You can also work on a hard top table or a concrete floor.The isolation acts as a shock absorber preventing ambient vibrations such as the compressor of a refrigerator from moving elements of your set up during an exposure and ruining the resulting hologram.
Aim the laser through the lens if you are using a HeNe laser. This will spread the beam out like a flashlight. If you are using a laser diode with its built in columating lens removed, the beam is already spread, so you won’t need to use the microscope objective at all. We refer to this beam of light as the “reference beam”. At a distance from the lens great enough to spread the laser light enough to more than cover the size of your object, mount the holographic film. Mount the film at roughly a 45 degree angle to the beam. This will be the “reference angle” you will use when you are lighting the completed hologram and are viewing it. Once you have aligned these elements you should secure them in place so they don’t move. If you choose to use film instead of a glass holographic plate you can sandwich the film between two pieces of glass using spring clamps. Glue the bottom rear back edge of the back plate of glass to the table top with hot glue available from a crafts or hardware store. Get a hot glue gun with a trigger feed. Make sure that the glue is only on the back edge. Do not touch the hot glue after it comes out of the gun. It is very hot and can cause serious burns. Wait until it cools in about a minute or so and has hardened. To remove it after it cools you can wet it with a little acetone to help break its bond.
If you are shooting glass plates you will need to make a glass plate holder. A pair of “U” channel metal rods or right angle stock can be glued to a bottom and top support bar so that the plate can slide down into it to the table. This holder should be hot glued to the table with buttress supports from the top of both “U” channels or angle stock to the table top. The plate holder can be made of hard wood that has had grooves routed out as well. You can use some modeling clay in each corner of the plate to prevent it from moving after you slide it into the channels. The plate and object are mounted sideways. I suggest that you paint all surfaces and plate holders flat black to prevent any unwanted light from degrading the quality of your hologram.
The laser light reflecting off the object is called the “object beam”. It then bounces back through the holographic film where it meets the “reference beam”. The two beams pass through each other creating an “interference pattern”. This interference pattern is what you are photographing on the holographic film.
Mount your object sideways with the top of the object nearest to the laser, directly behind the glass ( the opposite side of the glass from the laser). It helps to actually have it touch the glass but be careful not to scratch the emulsion surface of the film when mounting it or you can leave a visible scratch. The laser beam will “reflect” off the object. I like to use objects that are not too deep. Good beginner’s image are seashells or coins. The choice of your object is critical to your success. The object must be very solid. Metal, ceramic, plaster, or stone are good. Paper, plastic, feathers, string are very temperamental and are not for your first attempts since they are more prone to vibration problems that might tend to ruin your exposures. The object should be colored white, red, gold, or another light color. Black, green, or blue will disappear in a hologram so do not use objects made exclusively of them. However these colors can be used as long as they are within light colors. Remember the laser is shining red light on your object. The color red next to the color white on your object will all look like a single color. Red print on a white background will disappear. Try viewing your object through a red filter to get a good idea of how it will look in laser light. You can use hot glue to adhere them to another plate of quarter inch thick glass or better yet, a brick that you press up against the back plate (the far side) of the glass being used as your film holder. You must glue the bottom of each model holding plate to the table surface. I like to also take wooden or metal rods (pencils work just fine) and glue them at an angle from the top of each plate of glass to the table top as a flying buttress. This helps eliminate vibration problems that would cause the hologram to be dim or not work at all. The sturdier you secure the model and plate holder the more likely it is that your hologram will be successful.
Before you load holographic film you must now take a piece of black cardboard and lean it up against the front of the laser as a “shutter” to stop the beam of laser light from reaching the film holder.
Now take a holographic plate and in the dark put a corner of it between your lips. The side that sticks to your lips is the emulsion. Place that side toward the object (i.e. the coins or seashell). If you use holographic film, place the front plate of glass over the film and clamp it to the back plate with the spring clamps. I use three clamps. One on each side and one on the top. Now walk out of the room for at least 20 minutes. This allows the “camera” you have just made to “settle” and prevent vibration problems. Remember light waves are incredibly small. It takes very little to move them. Even the heat of the hot glue setting up is enough to ruin an exposure if you rush.
Come back in the room and walk next to the shutter. Wait one minute in silence without moving or touching the table, then lift the “shutter” card for about 10 seconds. Close the shutter. You might want to do a bracket exposure. In this process you cover three quarters of the film with a black card. After you have exposed the first quarter of the film you slide the black card back to allow the next quarter of the film to be exposed. Wait a minute for the system to settle and expose the film for an additional 5 seconds. Then you replace the shutter and move the black card back once again to allow another quarter of the film to be exposed. After you wait another minute to allow the film to settle again, open the shutter for yet another 5 seconds. Finally, you remove the black card completely, wait another minute, and expose a final 5 seconds. After you develop the film you will be able to see which amount of exposure time worked best. You can then adjust future exposures successfully. Take the film out from between the glass plates and develop it in your darkroom. If the darkroom is far from the film you might want to transport it there in a light proof box. Follow the procedure of development that the film manufacturer gives you. Generally, you will develop the film until it is dark or black and then bleach it clear and wash it. I suggest you wear vinyl gloves and an apron or lab jacket. Make sure the darkroom is well ventilated. Once the film is bleached for a minute and a half it is safe to turn on the room lights, but make sure the rest of your film is in a light proof container before you throw the light switch or it will be ruined. Most photochemistry recommends a washing off of the film or plate after bleaching. I like to give the hologram a final minute rinse in a tray of distilled or dionized water with a cap full of Kodak PhotoFlo mixed in. You will not see an image until the film is dry. You can see rainbows through the film if you hold it up to a light. This is the diffraction from the interference pattern you have just photographed on the film. It is a good sign that your hologram has worked. While it is wet the emulsion is swollen and thereby visible only to those who can see infrared light. Red light waves measure somewhere in the 600 plus nanometer size range. The HeNe laser for example puts out red light waves that measure 632.8 nanometers (nm – billionths of a meter). Its usually listed as simply 633 nm. The water now in the emulsion expands it into the invisible part of the spectrum somewhere in the infrared. So although the holographic image is actually there, we as humans can not yet see it. The water inside the emulsion from the developing process must be removed for the emulsion to shrink back down to the size of visible light. You can hang film holograms to dry or just stand up a holographic glass plate so it leans on a wall to let it dry slowly. If you are not patient, you can blow dry the film in front of a fan. Don’t use a hot blower. It can distort the film or start a fire. As the film or plate dries you will begin to see the image in the far red and then see its color shift as the film shrinks upon drying.
The dry hologram is best viewed with a bright spot light (halogen is best) You can also use a clear light bulb not a frosted bulb. Do not use fluorescent lighting to view holograms. It will make the image look blurry. Sunlight will work but it also will bombard the hologram with UV rays and tend to darken the film over a long period of time causing it to “print out”. It will still be a good hologram, but the film will no longer be clear. Do not get the hologram wet once it has dried. It can erase the image or spot it permanently. If you do get it wet, quickly soak it in water and carefully re-dry it.
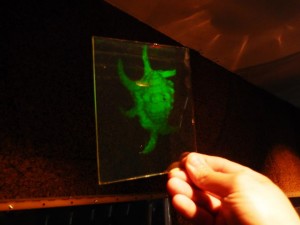
You may have some trouble finding the image the first time. Remember it must be lit with light coming from the same angle that it was created with (the “reference angle”). Try slowly rotating the film and turning it over until you see the holographic image. It should appear behind the film as a “virtual” image. It should look exactly the way your model was when you shot it (“orthoscopic”). If the object appears to be sideways you forgot to mount it sideways when you mounted the model. In that event its time to go back to your set up and rotate the object in your holographic camera 90 degrees and re-shoot. Now if you flip the film over the holographic image will appear to jump out in front of the film as a “real” image. This image is inside out or “pseudoscopic”. It helps to have a piece of black card stock behind the film to make it easier to see.
Congratulations! You are now a holographer! Let me know how you did.
Summary:
Reflection holograms are made by interfering the reference beam with the object beam from opposite sides of the holographic film. It is visible in white light.
Translate »
